关于
据说pylearn2停止开发了,当时觉得pylearn2虽然编码少,但是配置和文档使用不便,而且和其他库的融合
也不方便。后来看到有人推荐keras,了解了一下,发现很不错。他的底层编译采用theano,现在也加入
了tensorflow的支持。并且还可以与scikit-learn融合,将keras的模型包装成scikit-learn
里面的模型。基于这两点,决定学习这个库,初试了一下,感觉很不错。
快速入门 Step by step
快速入门教程参考官方文档http://keras.io
Step1. 创建Sequential模型,通过Sequential.add方法添加层。
from keras.models import Sequential
model = Sequential()

from keras.layers import Dense, Activation
model.add(Dense(output_dim=64, input_dim=100))
model.add(Activation("relu"))
model.add(Dense(output_dim=10))
model.add(Activation("softmax"))
Step2. 编译模型,可以指定优化方法和损失函数等
model.compile(loss='categorical_crossentropy', optimizer='sgd',
             metrics=['accuracy'])
Step3. 调用fit方法训练模型,这里采用随机生成的数据
x_train = np.random.randn(1000,100)
y_labels = np.random.randint(0,10,size=(1000,))
y_train = np.zeros((1000,10))
y_train[range(1000), y_labels] = 1

model.fit(x_train, y_train, nb_epoch=5, batch_size=20)
Step 4. 模型预测,这里采用另一组随机生成的数据
x_test = np.random.randn(1000,100)
y_labels = np.random.randint(0,10,size=(1000,))
y_test = np.zeros((1000,10))
y_test[range(1000), y_labels] = 1

classes = model.predict_classes(x_test, batch_size=20)
proba = model.predict_proba(x_test, batch_size=20)
配置
配置文件 ~/.keras/keras.json
- 从theano切换到TensorFlow,将
backend的值修改为tensorflow即可,默认是theano
Sequential model
所谓Sequential模型,就是多个layer的线性堆叠。可以通过构造函数创建一个多层的序列模型,
也可以通过.add()方法添加层。
## 通过构造函数创建模型,参数是 List[Model]
model = Sequential([
    Dense(32, input_dim=784),
    Activation('relu'),
    Dense(10),
    Activation('softmax'),
])
## 通过 .add() 添加层
model = Sequential()
model.add(Dense(32, input_dim=784))
model.add(Activation('relu'))
- 指定输入的shape,通常只有第一层必须指定,后面的层都可以自动获取
- 通过
input_shape指定,不需要样本大小,见例子 - 通过
batch_input_shape指定,需要指定样本大小 - 2D Layer 通过
input_dim指定各维大小,3D Layer通过input_dim和input_length两个参数指定
- 通过
model = Sequential()
model.add(Dense(32, input_shape=(784,)))

model = Sequential()
model.add(Dense(32, batch_input_shape=(None, 784)))
# note that batch dimension is "None" here,
# so the model will be able to process batches of any size.

model = Sequential()
model.add(Dense(32, input_dim=784))


## 3D
model = Sequential()
model.add(LSTM(32, input_shape=(10, 64)))
model = Sequential()
model.add(LSTM(32, batch_input_shape=(None, 10, 64)))
model = Sequential()
model.add(LSTM(32, input_length=10, input_dim=64))
Sequential model 的属性和方法
- compile 编译
- fit 拟合
- evaluate 评估
- predict 预测
- predict_classes 预测类别
- predict_proba 预测概率
- train_on_batch 在一个batch上更新模型,online learning ?
- test_on_batch
- predict_on_batch
- fit_generator 从一个generator而不是矩阵拟合模型,可以用来拟合数据保存在磁盘上的数据
- evaluate_generator 从generator评估模型
The Merge layer
可以通过 merge Layer 将多个输出融合到一起。融合的模式可以选择:
- sum (default): element-wise sum
- concat: tensor concatenation. You can specify the concatenation axis via the argument concat_axis.
- mul: element-wise multiplication
- ave: tensor average
- dot: dot product. You can specify which axes to reduce along via the argument dot_axes.
- cos: cosine proximity between vectors in 2D tensors.
from keras.layers import Merge

left_branch = Sequential()
left_branch.add(Dense(32, input_dim=784))

right_branch = Sequential()
right_branch.add(Dense(32, input_dim=784))

## mode='concat' 表示将两个tensor链接成一个长的tensor
merged = Merge([left_branch, right_branch], mode='concat')

final_model = Sequential()
final_model.add(merged)
final_model.add(Dense(10, activation='softmax'))

final_model.compile(optimizer='rmsprop', loss='categorical_crossentropy')
final_model.fit([input_data_1, input_data_2], targets)  # we pass one data array per model input
也可以采用自定义的函数进行融合。
merged = Merge([left_branch, right_branch], mode=lambda x, y: x - y)
编译模型
在训练一个模型之前,需要先编译,通过模型的compile方法进行。这个函数接受3个参数:
- optimizer,预定义优化器字符串或者 Optimizer 实例。预定义的优化器有:
sgdrmspropadagradadadeltaadamadamaxnadam
-
loss,损失函数,字符串或者 Theano/TensorFlow symbolic function,传入两个参数:y_true,y_pred,
传出一个标量。下面列出一部分,更多参考官方文档 http://keras.io/objectives/- mse 均方误差
- mae
- mape
- msle
- squared_hinge
- hinge SVM用的损失函数
- binary_crossentropy 对数损失函数
- categorical_crossentropy 多类别对数损失函数
-
metrics列表,注意是列表。也接收字符串和用户定义函数。
- accuracy
# for a multi-class classification problem
model.compile(optimizer='rmsprop',
              loss='categorical_crossentropy',
              metrics=['accuracy'])

# for a binary classification problem
model.compile(optimizer='rmsprop',
              loss='binary_crossentropy',
              metrics=['accuracy'])

# for a mean squared error regression problem
model.compile(optimizer='rmsprop',
              loss='mse')
训练
输入np.ndarray,调用fit训练模型。
# train the model, iterating on the data in batches
# of 32 samples
model.fit(data, labels, nb_epoch=10, batch_size=32)
模型评估
调用 evaluate 方法评估。
模型预测
classes = model.predict_classes(X_test, batch_size=32)
proba = model.predict_proba(X_test, batch_size=32)
序列模型的例子
序列模型的更多例子参考官方文档 http://keras.io/getting-started/sequential-model-guide/。
这里确实有很多例子,都比较短。
functional API
用来解决 Sequential 模型 和 merge 无法构建的复杂模型。
The Keras functional API is the way to go for defining complex models, such as multi-output models, directed acyclic graphs, or models with shared layers.
- 一个 Layer 是一个callable实例,传入一个tensor,输出一个tensor
- 输入tensor 和输出tensor 可以用来定义一个模型,与 theano 的函数一样
- 上述定义的模型可以和Sequential 模型一样训练
from keras.layers import Input, Dense
from keras.models import Model

# this returns a tensor
inputs = Input(shape=(784,))

# a layer instance is callable on a tensor, and returns a tensor
x = Dense(64, activation='relu')(inputs)
x = Dense(64, activation='relu')(x)
predictions = Dense(10, activation='softmax')(x)

# this creates a model that includes
# the Input layer and three Dense layers
model = Model(input=inputs, output=predictions)
model.compile(optimizer='rmsprop',
              loss='categorical_crossentropy',
              metrics=['accuracy'])
model.fit(data, labels)  # starts training
- 所有模型都是callable,所以可以重用一个模型。利用
TimeDistributed,可以将图像的模型应用到video处理。
x = Input(shape=(784,))
# this works, and returns the 10-way softmax we defined above.
y = model(x)

from keras.layers import TimeDistributed

# input tensor for sequences of 20 timesteps,
# each containing a 784-dimensional vector
input_sequences = Input(shape=(20, 784))

# this applies our previous model to every timestep in the input sequences.
# the output of the previous model was a 10-way softmax,
# so the output of the layer below will be a sequence of 20 vectors of size 10.
processed_sequences = TimeDistributed(model)(input_sequences)
多输入多输出模型
例如下图
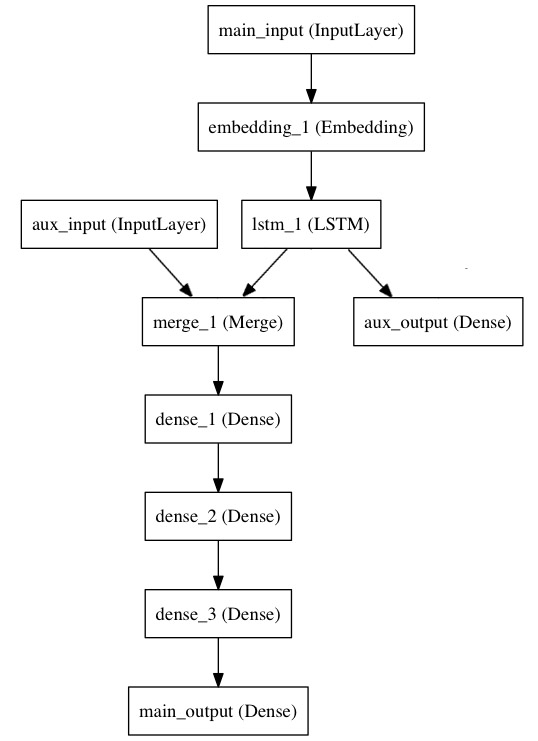
from keras.layers import Input, Embedding, LSTM, Dense, merge
from keras.models import Model

# headline input: meant to receive sequences of 100 integers, between 1 and 10000.
# note that we can name any layer by passing it a "name" argument.
main_input = Input(shape=(100,), dtype='int32', name='main_input')

# this embedding layer will encode the input sequence
# into a sequence of dense 512-dimensional vectors.
x = Embedding(output_dim=512, input_dim=10000, input_length=100)(main_input)

# a LSTM will transform the vector sequence into a single vector,
# containing information about the entire sequence
lstm_out = LSTM(32)(x)

# Here we insert the auxiliary loss, allowing the LSTM and Embedding layer
# to be trained smoothly even though the main loss will be much higher in the model.
auxiliary_loss = Dense(1, activation='sigmoid', name='aux_output')(lstm_out)

# concat lstm_out 和 auxiliary_input 作为后续模型的输入
auxiliary_input = Input(shape=(5,), name='aux_input')
x = merge([lstm_out, auxiliary_input], mode='concat')

# we stack a deep fully-connected network on top
x = Dense(64, activation='relu')(x)
x = Dense(64, activation='relu')(x)
x = Dense(64, activation='relu')(x)

# and finally we add the main logistic regression layer
main_loss = Dense(1, activation='sigmoid', name='main_output')(x)

# 创建这个多输入多输出模型
model = Model(input=[main_input, auxiliary_input], output=[main_loss, auxiliary_loss])

# 编译模型
# We compile the model and assign a weight of 0.2 to the auxiliary loss.
# To specify different loss_weights or loss for each different output,
# you can use a list or a dictionary. Here we pass a single loss as the loss argument,
# so the same loss will be used on all outputs.
model.compile(optimizer='rmsprop', loss='binary_crossentropy',
              loss_weights=[1., 0.2])
# 训练模型
model.fit([headline_data, additional_data], [labels, labels],
          nb_epoch=50, batch_size=32)

# 因为我们为每一个输出层设置了name,所以也可以通过字典而不是list指定参数
model.compile(optimizer='rmsprop',
              loss={'main_output': 'binary_crossentropy', 'aux_output': 'binary_crossentropy'},
              loss_weights={'main_output': 1., 'aux_output': 0.2})

# and trained it via:
model.fit({'main_input': headline_data, 'aux_input': additional_data},
          {'main_output': labels, 'aux_output': labels},
          nb_epoch=50, batch_size=32)
Shared layers 共享层
比如训练一个模型,预测两个tweets是否来自同一个人,首先可以用LSTM将两个tweet转换为两个向量,
而这个LSTM对两个tweet都能用,所以可以将这个LSTM层共享。
from keras.layers import Input, LSTM, Dense, merge
from keras.models import Model

tweet_a = Input(shape=(140, 256))
tweet_b = Input(shape=(140, 256))

# this layer can take as input a matrix
# and will return a vector of size 64
shared_lstm = LSTM(64)

# when we reuse the same layer instance
# multiple times, the weights of the layer
# are also being reused
# (it is effectively *the same* layer)
encoded_a = shared_lstm(tweet_a)
encoded_b = shared_lstm(tweet_b)

# we can then concatenate the two vectors:
merged_vector = merge([encoded_a, encoded_b], mode='concat', concat_axis=-1)

# and add a logistic regression on top
predictions = Dense(1, activation='sigmoid')(merged_vector)

# we define a trainable model linking the
# tweet inputs to the predictions
model = Model(input=[tweet_a, tweet_b], output=predictions)

model.compile(optimizer='rmsprop',
              loss='binary_crossentropy',
              metrics=['accuracy'])
model.fit([data_a, data_b], labels, nb_epoch=10)
layer node
当输入或者输出只有一个时,可以通过 .input_shape 和 .get_output, .output, .output_shape 获取输入输出的信息。
当有多个的时候,需要用 .get_output_at, .get_input_shape_at 替代。
一些例子
一些前沿的例子,见http://keras.io/getting-started/functional-api-guide/
- inception modeule
- residual connection
from keras.layers import merge, Convolution2D, Input

# input tensor for a 3-channel 256x256 image
x = Input(shape=(3, 256, 256))
# 3x3 conv with 3 output channels (same as input channels)
y = Convolution2D(3, 3, 3, border_mode='same')
# this returns x + y.
z = merge([x, y], mode='sum')
- Shared vision model
- Visual question answering model
- Video question answering model
Layers
对Layer的抽象
一个layers需要有以下方法:
- .get_weights()
- .set_weights()
- .get_config()
一个Layers可以通过构造函数创建,也可以通过config创建,采用layer_utils包中的layer_from_config()函数。
对于单节点的layer,可以通过这些属性获取输入输出
- .input
- .output
- .input_shape
- .output_shape
对于多节点的layer,则需要使用这些方法:
- .get_input_at(idx)
- .get_output_at(idx)
- .get_input_shape_at(idx)
- .get_output_shape_at(idx)
内置的核心Layers
Dense简单的全连接网络层,至少需要一个output_dim参数,对于非输入层,会自动获得输入的维数;
如果是输入层,还需要指定input_dim参数。重要的参数:activation激活函数,默认是线性函数,a(x)=x,即没有非线性变换,可以指定激活函数为预定义的非线性函数或者自定义的 element-wise 的符号函数。预定义函数可以通过字符串指定,常用的有:sigmoid, relu, tanh, softmax, hard_sigmoid, softsign, softplus
Activation(name)name 是激活函数的名字。既然Dense可以指定activation参数,为什么还要一个激活层?!Dropout(p)Dropout 层,参数是dropout的概率。 Dropout: A Simple Way to Prevent Neural Networks from OverfittingFlatten()将多维特征展开为一维特征,不会影响样本维度。常用在卷积网络。Reshape(hape)shape:Tuple,将特征尺寸reshape,不影响样本维度。Permute(dims)dims:Tuple[int,int,...] 将维度重新变换,如果dims是两个元素,相当于转置。
model = Sequential()
model.add(Permute((2, 1), input_shape=(10, 64)))
# now: model.output_shape == (None, 64, 10)
# note: `None` is the batch dimension
RepeatVector(n:Int)将输入重复n次,
model = Sequential()
model.add(Dense(32, input_dim=32))
# now: model.output_shape == (None, 32)
# note: `None` is the batch dimension

model.add(RepeatVector(3))
# now: model.output_shape == (None, 3, 32)
Merge(layers:List[Layer], mode:String|Function, ...)融合层。Lambda(func:Function, output_shape:Tuple, args:Dict)将任意符号函数应用到之前的层
# add a x -> x^2 layer
model.add(Lambda(lambda x: x ** 2))
ActivityRegularization(l1=0.0, l2=0.0)添加正则项?怎么添加的?Masking不懂,貌似跟LSTM层有关系Highway也不懂,貌似跟LSTM层有关MaxoutDensemaxout 层,是线性层,不像Dense,不能添加激活函数,需要在后面添加激活函数层。TimeDistributedDense不懂,貌似在RNN中有用
TensorFlow API
模型可视化
利用模块 keras.utils.visualize_util 里面的工具函数。
plot(model, to_file=filename, show_shapes=False, show_layer_names=True)保存到文件model_to_dot(model, show_shapes=False, show_layer_names=True).create(format='dot')输出为dot绘图格式,也可以指定format为svg等格式。然后利用IPython.display模块输出为SVG图像。
from keras.utils.visualize_util import plot
plot(model,show_shapes=True)

from IPython.display import SVG
from keras.utils.visualize_util import model_to_dot

SVG(model_to_dot(model, show_shapes=True).create(prog='dot', format='svg'))
sklearn API
将 Keras 模型封装成sklearn 的API。两个封装API,分别是分类器和回归器
keras.wrappers.scikit_learn.KerasClassifier(build_fn=None, **sk_params), which implements the sklearn classifier interface,keras.wrappers.scikit_learn.KerasRegressor(build_fn=None, **sk_params), which implements the sklearn regressor interface.
build_fn 需要返回一个模型,sk_params 是模型参数和fit/predict参数,另外需要模型所有参数都存在默认参数。
也接受fit, predict, predict_proba, and score函数的参数。
用sklearn API封装后,就可以利用sklearn的Gridsearch等工具进行调参了。